

- External Plugins
- Install panel plugins
External Plugins
Install panel plugins
Although xObserve provides a lot of high quality built-in components, the number of built-in components is still limited, especially the data source plug-ins. Therefore, we support third-party plug-ins to give users more choices.
About how to develop external plugins, please refer to the developer guide: https://github.com/xobserve/xobserve/wiki#developer-guides
Next, let’s install a simple panel plugin: demo, which is actually a simple text component for display some markdown text.
Install & Compile
Download the sourcecode of xObserve
First, we need to download the source code of xObserve.
If you are going to use xObserve in production evironment, you should choose release versions, but since this document only demonstrates how to install the plugin, you can download it directly from the main branch: https://github.com/xobserve/xobserve,
Download plugin
Download the plugin source code at https://github.com/xobserve/panel-plugin-demo and unzip it,
then copy the demo folder to the xObserve source code directory: /DATAV_ROOT/ui/external-plugins/panel,
├── query
├── release.sh
├── README.md
├── ui
├── plugins
│   ├── datasource
│   ├── buildPlugins.go
│   ├── removePlugins.go
│   ├── README.md
│   ├── panel
│   │   ├── demo
│   │   │   ├── Editor.tsx
│   │   │   ├── Panel.ts
│   │   │   ├── index.tsx
│   │   │   ├── demo.svg
│   │   │   ├── README.md
│   │   ├── candlestick
You can see that there is a new demo plugin directory in the panel directory. In addition to the new demo directory we added, there is also a candlestick directory, which is an external plugin provided by xObserve. We will learn how to develop a complex external panel plugin through it in the developer guide.
Install plugins
After putting the plugin source code into the specified directory, you need to call the corresponding script to install it.
Still in the /DATAV_ROOT/ui/external_plugins/panel directory, run
go run buildPlugins.go
2023/09/26 09:49:08 Generate panel plugins file successfully!
As you can see, the script has been successfully executed, and the prompt Generate panel plugins file successfully! indicates that the plugin source code has been installed in the corresponding directory.
For specific installation directories, please refer to the developer guide.
Compie xObserve
Since the source code of the new plugin is already installed to the UI source code, we can recompile xObserve now to make the new code working.
Note: This document only demonstrates the use of plugins. In actual scenarios, you only need to recompile the UI source code, and then put the compiled static files on the corresponding static file server, such as Nginx or the static file server built in xObserve.
In fact, this document uses the static file server built in xObserve.
Enter the root directory of xObserve source code and run release.sh:
./release.sh This script will compile xObserve completely, and finally generate the executable files of xObserve for multiple platforms, as well as the frontend static resource files.
After compilation, you can find a new release directory in the root directory, with the following content:
├── xobserve-darwin-amd64.zip
├── xobserve-linux-amd64.zip
├── xobserve-windows-amd64.zipUnzip the release files
Assuming you are using macos, then you only need to unzip xobserve-darwin-amd64.zip in the release directory. The directory structure after unzipping is as follows:
├── xobserve   # executive binary for api server and static file server
├── xobserve.sql # the sql file that mysql requires
├── xobserve.yaml # api server configurations
├── ui # frontend static resource filesStart xObserve server
The release structure is very simple and clear. Next, we can start the API server and static resource server of xObserve. These words sounds very complicated, right? In fact, you only need to:
./xobserveYou may be curious, don’t you need to start an API server and a static resource server separately? Why is only the API server started? In fact, xobserve also comes with a built-in static resource server.
The most wonderful thing is that the API server and the static resource server share the same port, which is convenient for everyone to use. Of course, you can also put the UI static resources under the Nginx server, which is more suitable for the production environment.
Use the newly installed plugin
After starting xobserve, open the browser and visit http://localhost:10086, create a panel end edit it, you will see the following interface:
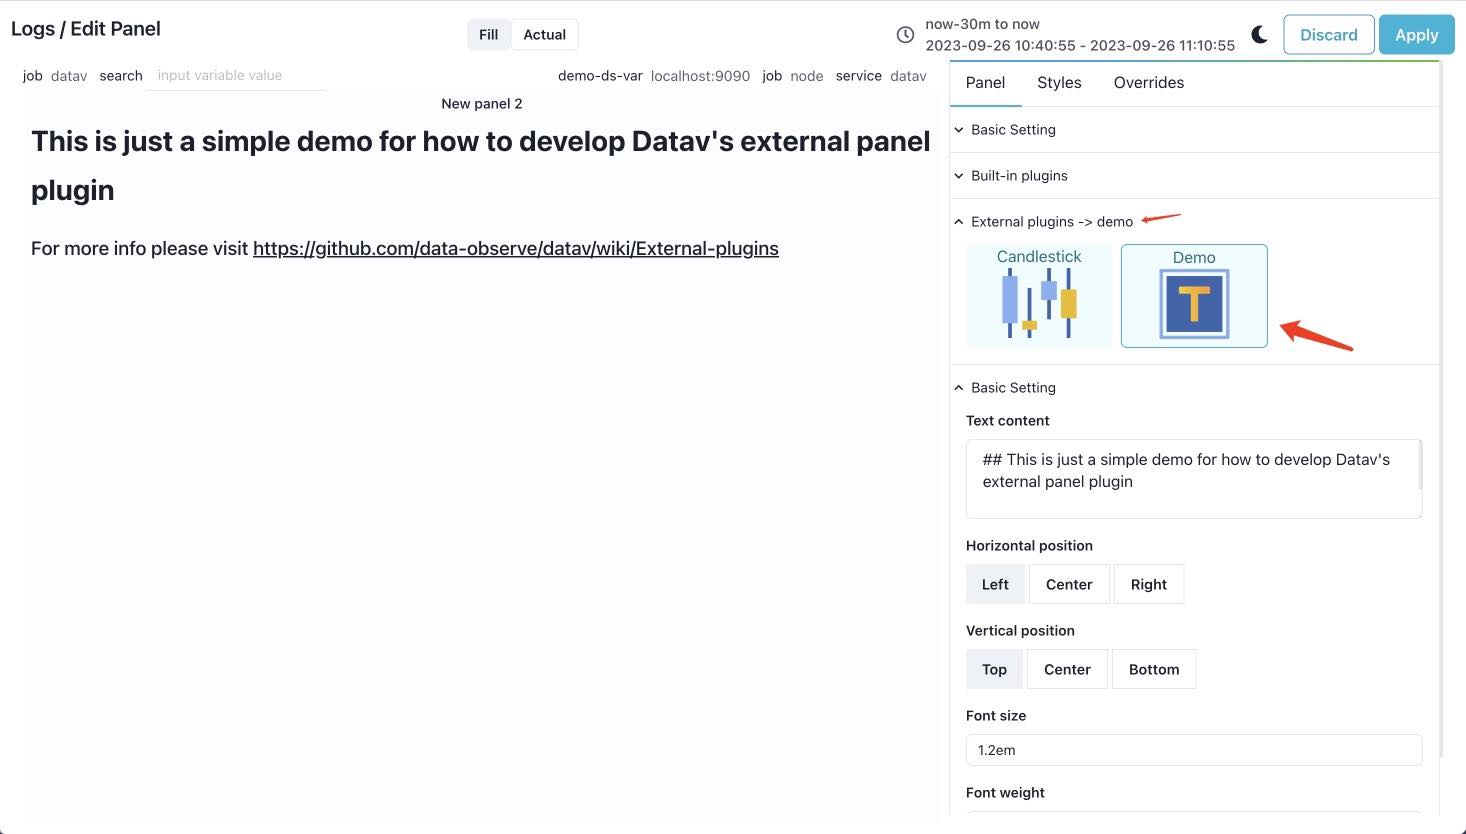
You can see that the new demo plugin has successfully appeared in the panel list. There are two points to note:
demois placed underExternal pluginstab- There is also a
Candlestickplugin next todemo, which is an preinstalled external panel plugin provided by xObserve. It is very powerful and feature-rich.